本文核心内容来源于视频:https://www.douyin.com/video/7529703060969508130, 并对其中部分内容做了修订,建议先观看视频,文字内容作为补充。
这两年大模型飞速发展,语言理解和逻辑推理能力越来越强大,但你是否也发现了一个问题:尽管这些模型能“说”得非常漂亮,它们却很难“做”事情。比如,让大模型写个代码没问题,但让它保存到文件里?还的你动手,更别说部署了。这就是大模型最本质的限制——它无法直接感知和改变外部环境。
接下来,我将带你深入理解如何利用工具赋能大模型,构建具备“感官”和“行动力”的智能体 ( Agent ),详细讲解 ReAct 与 Plan-and-Execute 两种主流的 Agent 设计模式,并以实例代码演示如何从0开始构建一个简单的 Agent,让你对 Agent 的构建原理了然于心。
大模型的局限:无法感知与行动
先来看一个简单例子:你让 GPT-4o 帮你写一个贪吃蛇游戏,它确实能生成一份不错的代码。但写完后呢?它无法把代码写入本地文件、也不能运行程序、更不会自己浏览项目目录。哪怕你已经有了一些代码,想让它“接着改”,也只能手动复制粘贴。
换句话说,大模型是“盲”和“瘫”的,它不知道外部世界发生了什么,也无法改变它,除非你主动告诉它一切。
Agent:给大模型插上“感官与手脚”
如何让大模型突破这一限制?答案是:工具(Tools)。
我们可以为大模型接上各种工具:读写文件、运行终端命令、访问网络 API、调用数据库……这样一来,大模型就获得了对外部世界的访问能力。它可以主动查看文件、修改代码、运行脚本,甚至通过浏览器收集信息、生成网页。
当我们将大模型与一组工具结合,并用程序协调其运行逻辑时,就诞生了一个具有“感知”和“行动”能力的智能体——Agent。通常我们用“脑袋”表示大模型,用“机器人”图标表示 Agent,原因也正是如此:Agent 是能“动”的模型。
当然,Agent 的用途远不止编程,它还可以:
以编程为例,最知名的 Agent 产品之一就是 Cursor。你只需给它一个开发目标,它便会通过调用模型和工具帮你分步骤实现功能,甚至包括运行调试和保存文件。
另一例是 Manus,它可以根据一个问题自动制定搜索计划,访问网页提取信息,最终整理成结构化的报告。整个过程无需你手动干预,真正做到了从“问题”到“答案”的全自动链路。
Agent 的核心设计模式:ReAct 模式
常见的 Agent 设计模式有 9 种,详情可参考:Agent的九种设计模式。其中使用最广泛的一种便是在 2022 年提出的 ReAct 模式,即:Reasoning and Acting,思考与行动。研究者在论文中提出了一种新的方法,通过结合大语言模型的推理能力和行动来解决多样化的语言推理和决策任务。
ReAct 的典型流程如下:
- Thought(思考):Agent 接收到任务后,会进行一步推理,决定接下来要做什么
- Action(行动):如果需要外部信息,它会调用工具,例如读取文件或运行命令
- Observation(观察):工具执行完后返回结果,Agent 观察结果并再次思考
- 循环:Thought → Action → Observation 会反复进行,直到任务完成
- Final Answer(最终答案):Agent 给出最终结果,流程结束
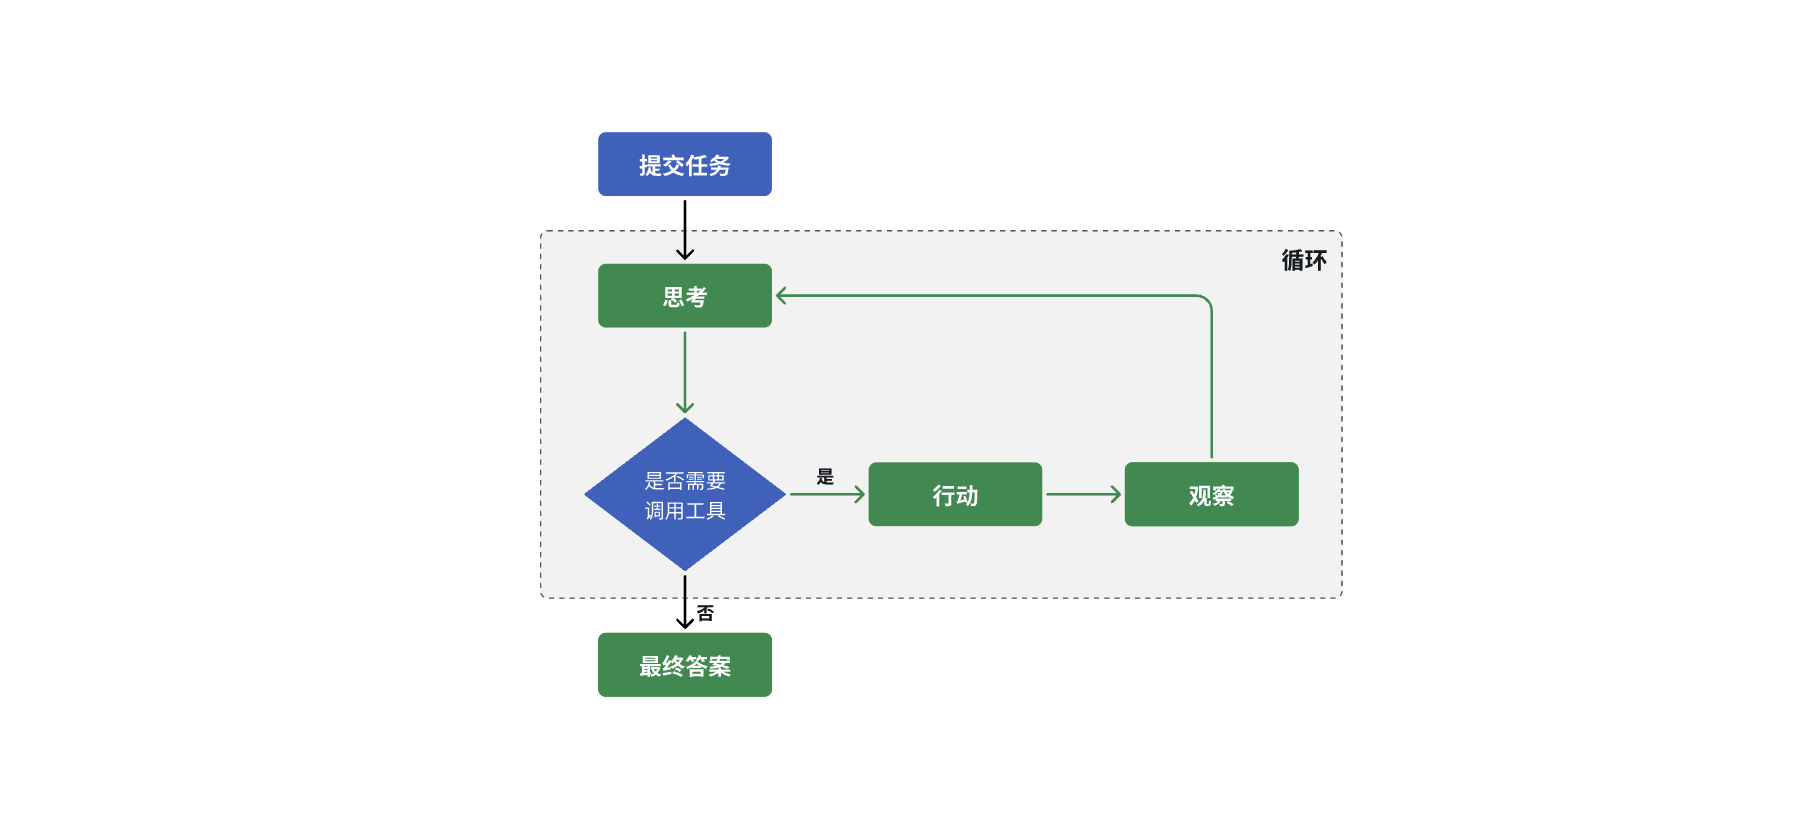
“思考-执行循环”让 Agent 具备了“自我调节”的能力,每一步都基于环境反馈动态调整,非常适合复杂任务拆解与多轮操作。那大模型是怎么知道要先思考、再调用工具、再观察结果的?这是通过系统提示词(System Prompt)实现的,具体的流程如下:
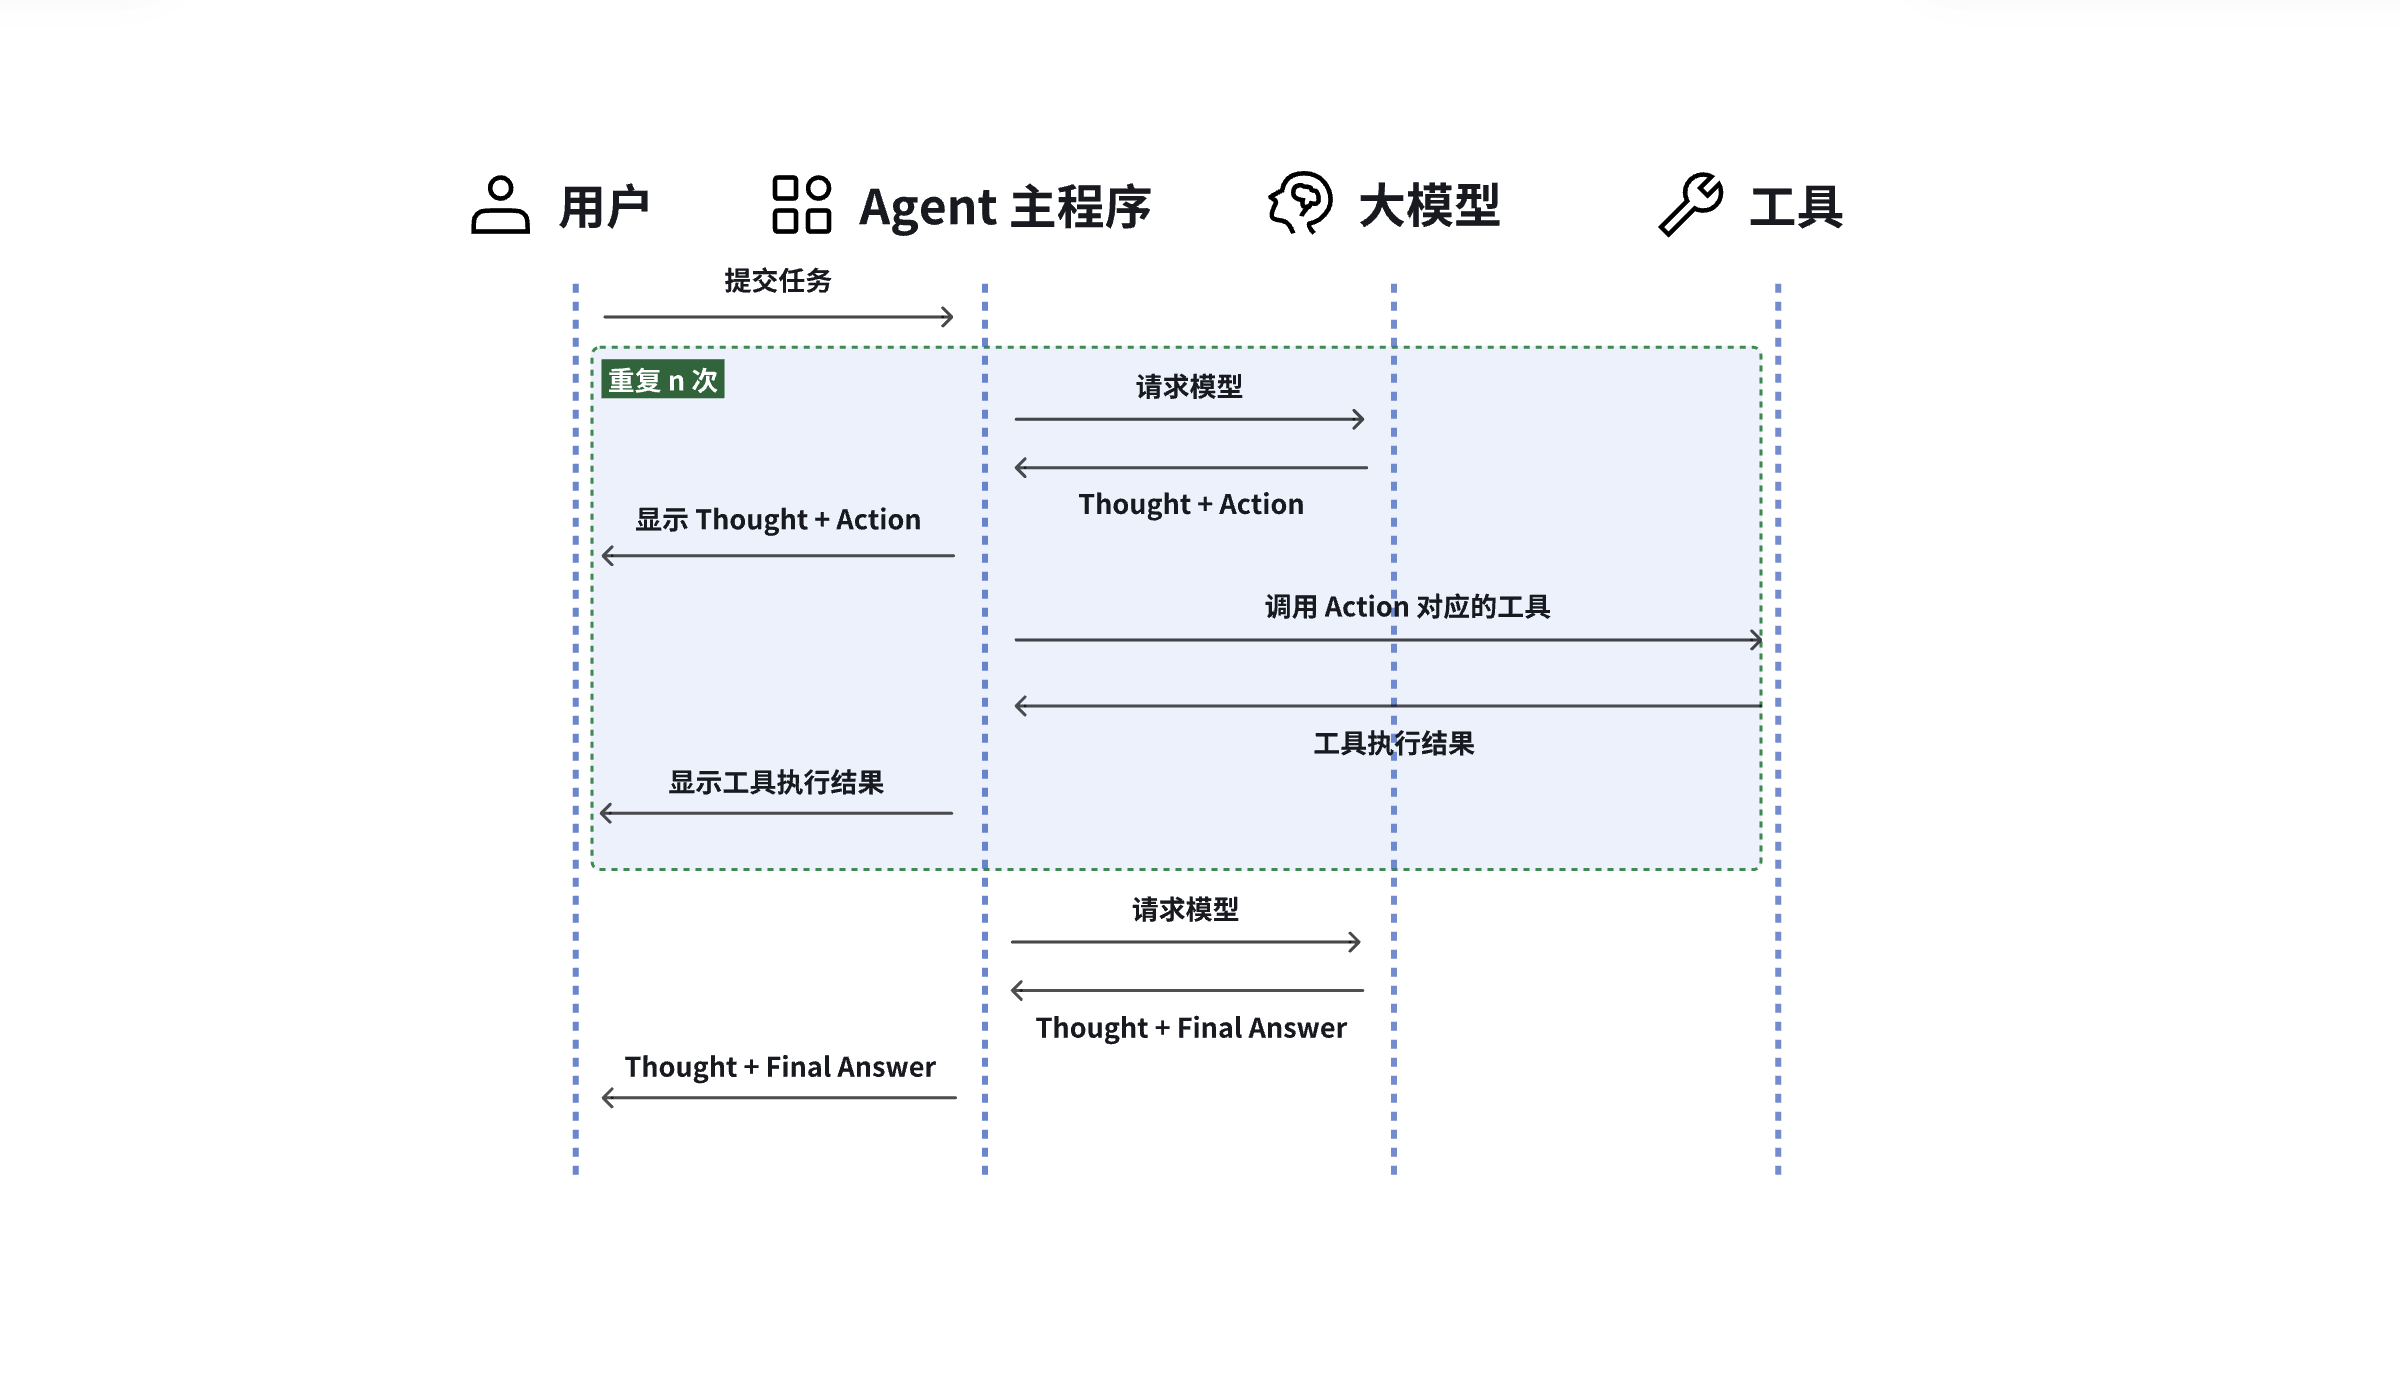
- 生成提示词:将代码中预设的提示词模板与用户的问题合并,得到发送给大模型的提示词
- 调用大模型生成 Thought 和 Action:大模型针对用户的问题会生成一堆的 Thought 和 Action,如果大模型的响应中包含 Action,程序会让大模型停止输出,去调用工具执行具体的动作
- 调用外部工具:程序在拿到 Action 后,就可以去调用外部工具了。当然在调用之前,会先判断是不是包含 Action,如果没有,则表示是最终答案,整个流程结束
- 生成 Observation:工具调用完成后,会拿到工具的执行结果,并将其转换为自然语言输出,生成 Observation。接下来,将 Observation,加上刚刚的 Thought、Action 等内容继续扔给大模型,重复第2,3步,直到没有 Action 为止
- 完成输出:将最后一个的 Observation 输出给用户
下面的代码模拟了 ReAct 的流程,系统提示词模板,请参考附录1,完整的代码可以参考:https://github.com/MarkTechStation/VideoCode/blob/main/Agent的概念、原理与构建模式/agent.py
def run(self, user_input: str):
    # 根据系统提示词模板构建发送给大模型的提示词
    messages = [
        {"role": "system", "content": self.render_system_prompt(react_system_prompt_template)},
    {"role": "user", "content": f"<question>{user_input}</question>"}
  ]
    # 一直循环,直到返回<final_answer>
    while True:

        # 请求模型
    content = self.call_model(messages)

        # 检测 Thought,用打印结果模拟在用户端显示
    thought_match = re.search(r"<thought>(.*?)</thought>", content, re.DOTALL)
    if thought_match:
        thought = thought_match.group(1)
      print(f"\n\n💭 Thought: {thought}")

      # 检测模型是否输出 Final Answer,如果是的话,直接返回
      if "<final_answer>" in content:
          final_answer = re.search(r"<final_answer>(.*?)</final_answer>", content, re.DOTALL)
        return final_answer.group(1)

      # 检测 Action
      action_match = re.search(r"<action>(.*?)</action>", content, re.DOTALL)
      if not action_match:
          raise RuntimeError("模型未输出 <action>")
      action = action_match.group(1)
      tool_name, args = self.parse_action(action)
            print(f"\n\n🔧 Action: {tool_name}({', '.join(args)})")

      # 只有终端命令才需要询问用户,其他的工具直接执行
      should_continue = input(f"\n\n是否继续?(Y/N)") if tool_name == "run_terminal_command" else "y"
      if should_continue.lower() != 'y':
          print("\n\n操作已取消。")
        return "操作被用户取消"

        try:
            observation = self.tools[tool_name](*args)
          except Exception as e:
            observation = f"工具执行错误:{str(e)}"
        print(f"\n\n🔍 Observation:{observation}")

        # 将Observation添加到消息列表末尾
        obs_msg = f"<observation>{observation}</observation>"
        messages.append({"role": "user", "content": obs_msg})
Plan and Execute 模式:先想清楚,再行动
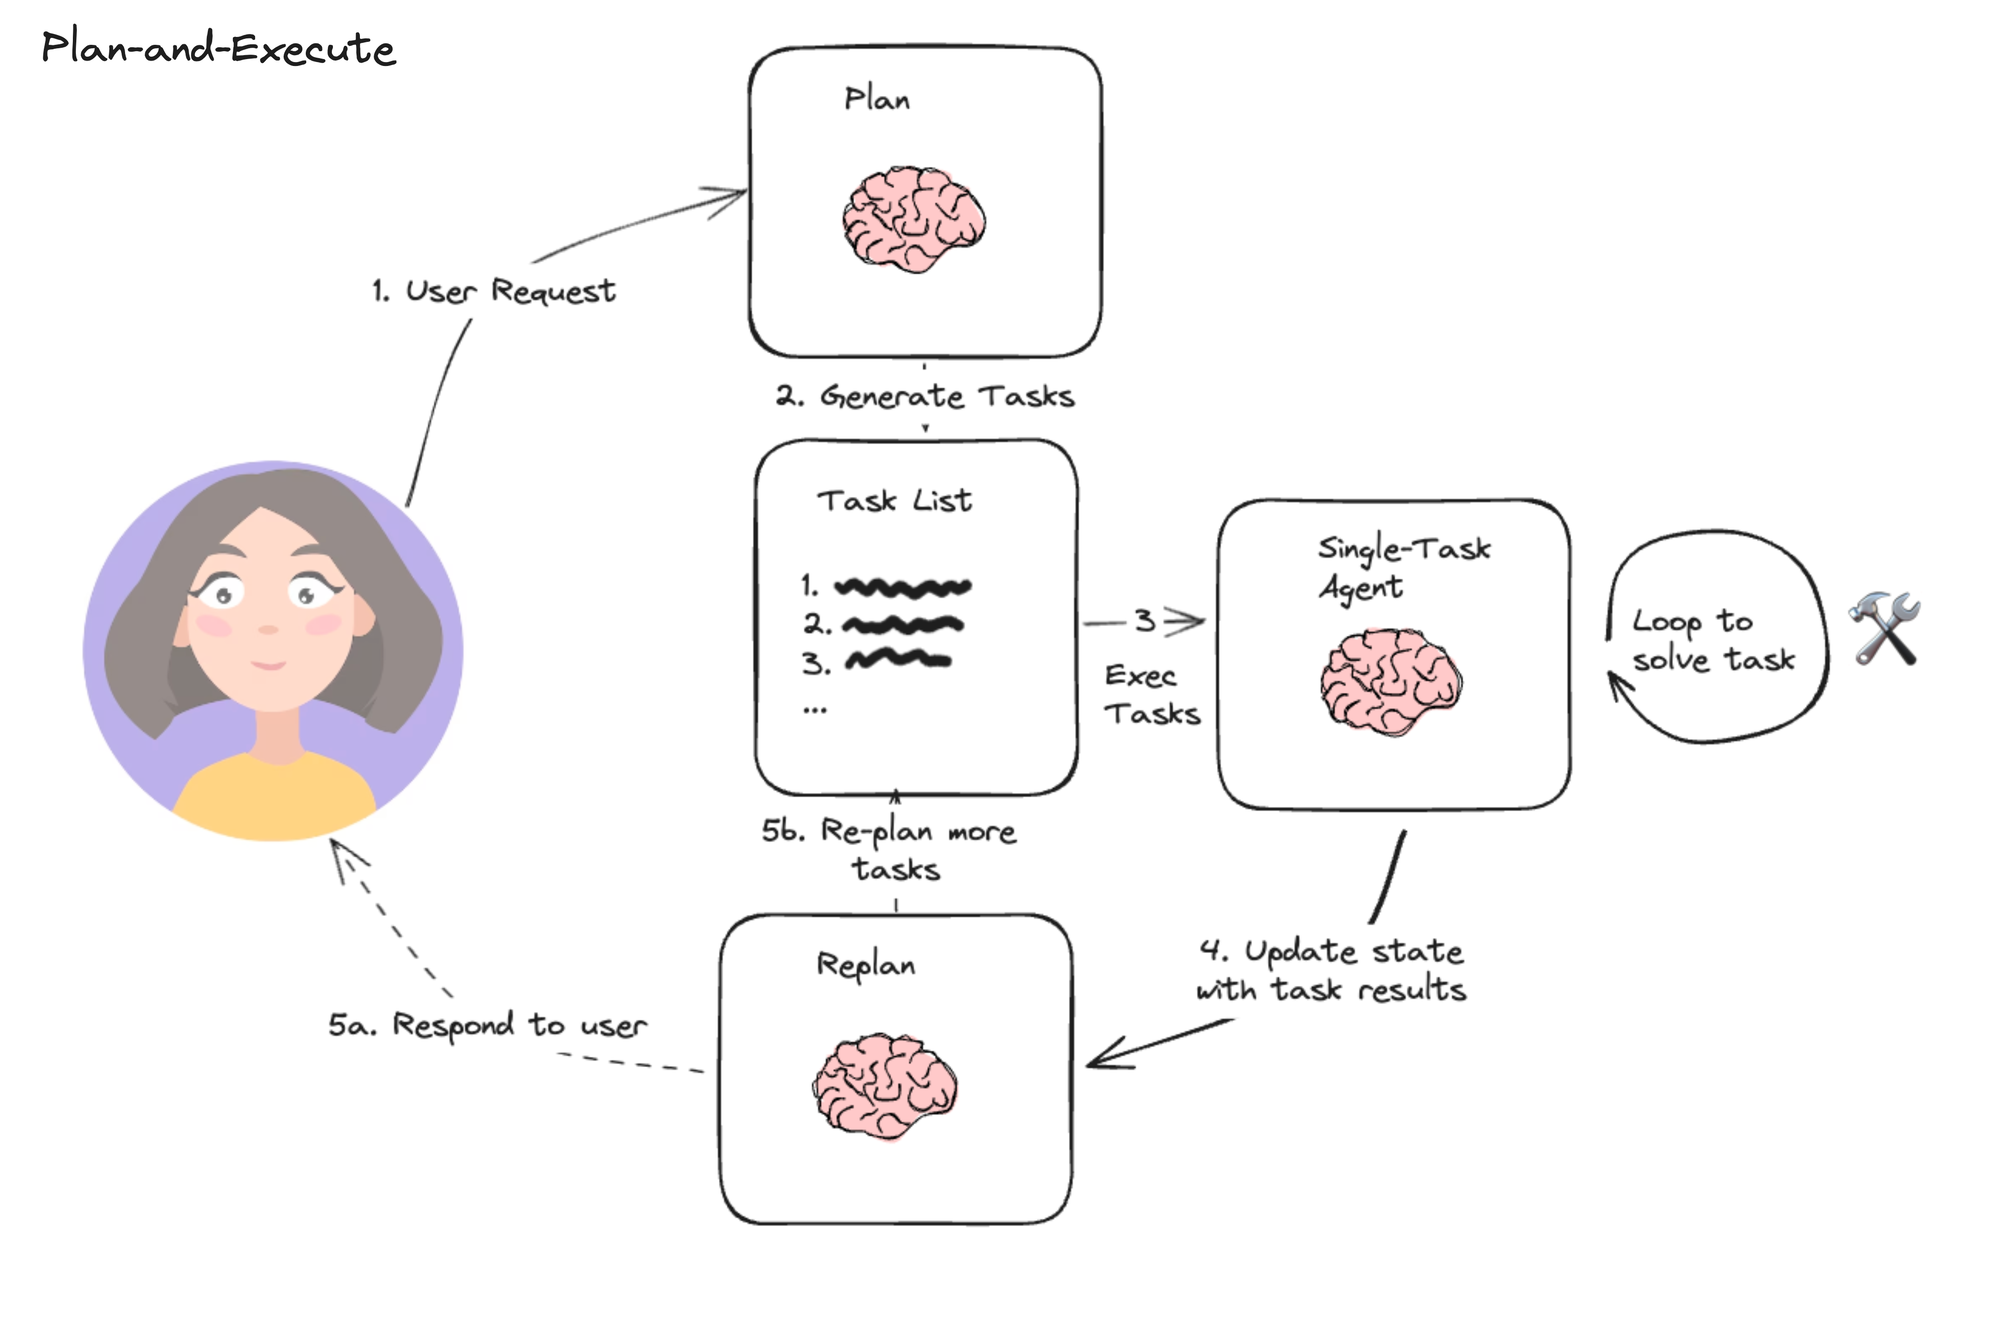
除了 ReAct,还有另一种常见模式是 Plan and Execute(规划并执行),它深受 Plan-and-Solve 论文以及 Baby-AGI 项目的启发,所以有时也被称为 Plan and solve 模式。这种模式的核心思想是 先列出计划清单(Plan),然后逐步执行(Execute)。你需要计划,并且过程中计划可能会变化,Manus 就采用了这种思路。它会先生成一份包含多个子任务的计划,然后再依次执行每个步骤。执行过程中,如果发现计划不合理,还会动态调整计划(Replan)。
一个 Plan-and-Execute Agent 通常包含以下模块:
- Plan 模型:负责生成初始计划
- Replan 模型:根据执行反馈调整计划
- 执行 Agent:实际完成每个步骤(可用 ReAct 模式)
- Agent 主程序:协调整个流程,判断何时结束
各个模块协作的流程示意图如下所示。
与 ReAct 模式相比,这种“计划-执行”风格的 Agent 有两个优势:
- 有明确的长期规划,且能适时的调整计划。在 ReAct 模式中,如果任务列表中的某个任务执行失败,是很难再继续往下执行的。
- 执行阶段可以使用轻量模型或工具,只在规划步骤使用较大/更好的模型,大幅节约资源和成本
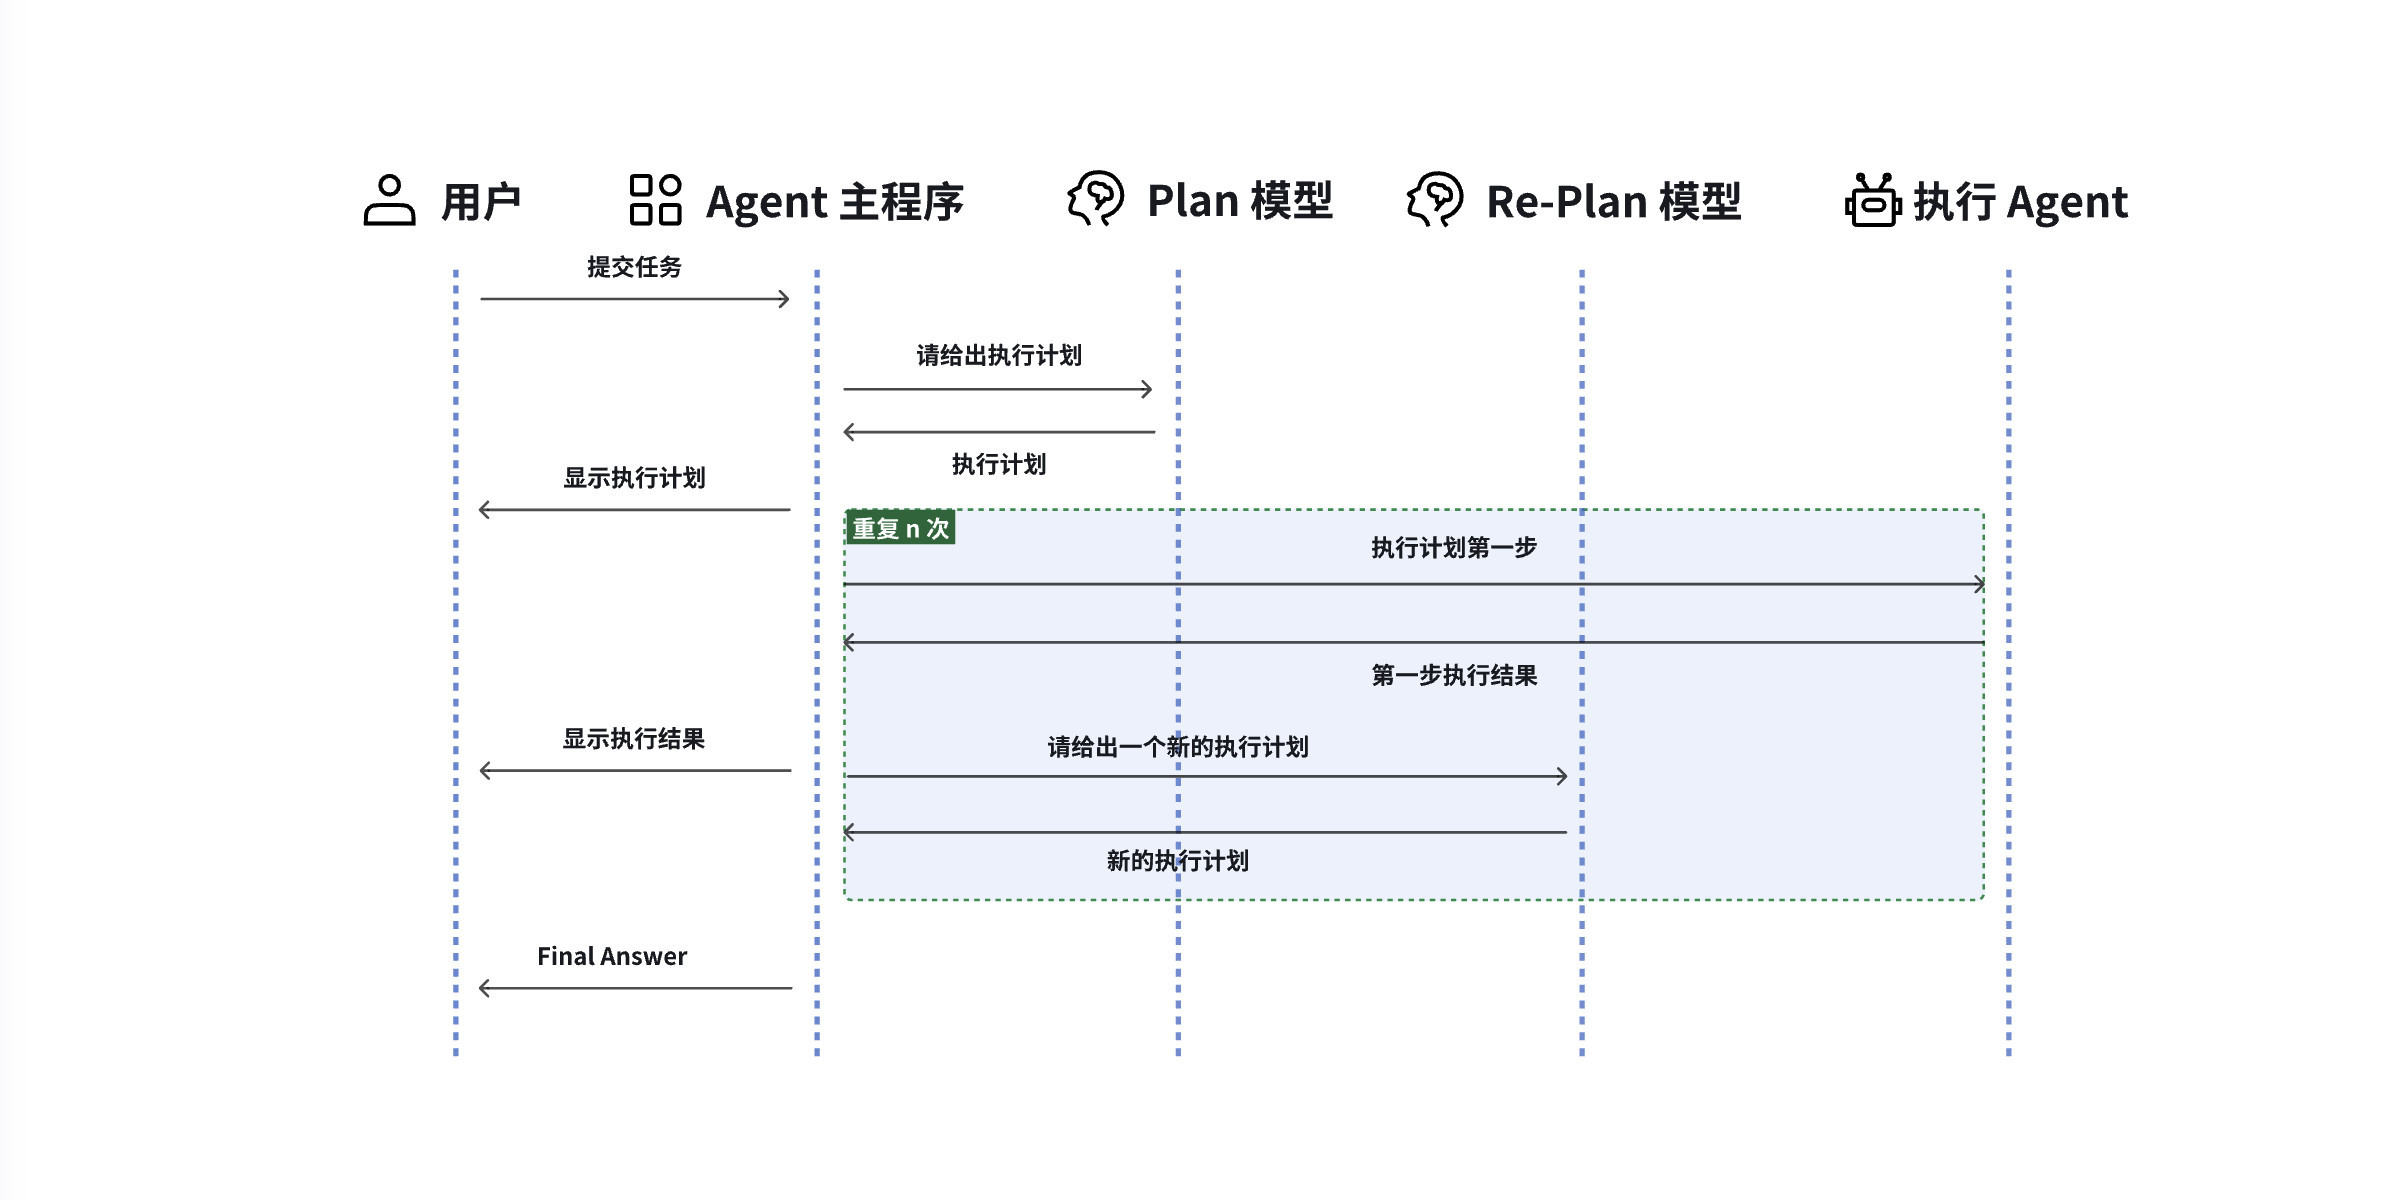
Plan and Execute 模式运行过程中的数据流转如上图所示。接下来,我会利用 LangGraph 一步步构建一个简单的 Agent,你也可以直接 阅读原文。
1、设置
首先,我们需要安装所需的包。
pip install --quiet -U langgraph langchain-community langchain-openai tavily-python
接下来,我们需要为 OpenAI(我们将使用的 LLM)和 Tavily(我们将使用的搜索工具)设置 API 密钥。国内使用 Kimi 和 DeepSeek 的 API 密钥都可以,Tavily 可以注册一下,注册完就可以看到 API 密钥了。
import getpass
import os

# 先检查环境变量中是否有指定字符串的环境变量
# 在这里表示:先检查环境变量中有没有OPENAI_API_KEY和TAVILY_API_KEY
def _set_env(var: str):
        # 如果环境变量中没有,则需要接收用户输入的内容
    if not os.environ.get(var):
        os.environ[var] = getpass.getpass(f"{var}: ")

_set_env("OPENAI_API_KEY")
_set_env("TAVILY_API_KEY")
2、定义工具
我们将首先定义要使用的工具。对于这个简单的示例,我们将使用 Tavily 提供的内置搜索工具。在 LangChain 中如何创建自己的工具,可以参考 这里。
from langchain_community.tools.tavily_search import TavilySearchResults

tools = [TavilySearchResults(max_results=3)]
3、创建执行 Agent
现在将创建我们想要用来执行任务的执行 Agent。请注意,在这个示例中,每个任务使用相同的执行代理,但在实际的业务中,可以创建多个不同的 Agent 来处理不同类型的任务。
from langchain_openai import ChatOpenAI

from langgraph.prebuilt import create_react_agent

# 如果使用Kimi或deepseek,需要手动设置base_url,如果使用openAI则无需设置
llm = ChatOpenAI(model="deepseek-chat",base_url="https://api.deepseek.com/v1")
prompt = "You are a helpful assistant."
agent_executor = create_react_agent(llm, tools, prompt=prompt)
定义好的 Agent,可以通过如下方式来执行:
agent_executor.invoke({"messages":[("user","who is the winner of the US Open")]})
4、定义状态
为更有序地管理整个流程,需要定义一个状态结构(state),通常包含以下字段:
input: 用户提供的原始输入plan: 一系列待执行步骤(字符串列表)pastSteps: 已执行步骤和对应结果的列表response: 最终产生的回应/答案
JavaScript 版本用 LangGraph 的 Annotation 定义,Python 版本用 TypedDict 或 Pydantic 定义:
class PlanExecute(TypedDict):
    input: str
    plan: List[str]
    past_steps: Annotated[List[Tuple], operator.add]
    response: str
5、规划步骤
使用大模型生成结构化的执行计划,确保每一步都具体、必需、无遗漏,执行计划 的 Python 定义如下:
class Plan(BaseModel):
    steps: List[str] = Field(..., description="sorted ordered steps")
用提示词让大模型思考,并给出具体的步骤,下面是具体的示例代码。系统提示词的大意:“对给定目标,想出一份涉及单个子任务的简单步进计划。不要多余步骤,最终一步的结果就是最后答案。”
from langchain_core.prompts import ChatPromptTemplate
// 系统提示词
planner_prompt = ChatPromptTemplate.from_messages(
    [
        (
            "system",
            """For the given objective, come up with a simple step by step plan. \
This plan should involve individual tasks, that if executed correctly will yield the correct answer. Do not add any superfluous steps. \
The result of the final step should be the final answer. Make sure that each step has all the information needed - do not skip steps.""",
        ),
        ("placeholder", "{messages}"),
    ]
)
// 大模型输出"Plan"类型的结构化数据
planner = planner_prompt | ChatOpenAI(model="gpt-4o", temperature=0).with_structured_output(Plan)
调用 invoke 函数来生成计划:
planner.invoke(
    {
        "messages": [
            ("user", "what is the hometown of the current Australia open winner?")
        ]
    }
)
# 输出的结果
# Plan(steps=['Identify the current winner of the Australia Open.', 'Find the hometown of the identified winner.'])
6、重新规划
执行 Agent 拿到计划中的步骤并逐一执行,并将执行结果更新到 pastSteps 中,然后触发重新规划的逻辑,即询问大模型:任务是否完成?
- 如果未完成,就生成新的执行计划或继续下一步
- 如果完成,生成最终答复
整个流程就形成了 执行→检查→是否重新规划→执行… 的循环,直到结束。
具体的实现可以参考下面的代码,系统提示词中包含3个变量:
input: 用户提供的原始输入plan: 原始的计划pastSteps: 已执行步骤和对应结果的列表
from typing import Union

class Response(BaseModel):
    response: str

class Act(BaseModel):
    action: Union[Response, Plan] = Field(
        description="Action to perform. If you want to respond to user, use Response. "
        "If you need to further use tools to get the answer, use Plan."
    )

replanner_prompt = ChatPromptTemplate.from_template(
    """For the given objective, come up with a simple step by step plan. \
This plan should involve individual tasks, that if executed correctly will yield the correct answer. Do not add any superfluous steps. \
The result of the final step should be the final answer. Make sure that each step has all the information needed - do not skip steps.

Your objective was this:
{input}

Your original plan was this:
{plan}

You have currently done the follow steps:
{past_steps}

Update your plan accordingly. If no more steps are needed and you can return to the user, then respond with that. Otherwise, fill out the plan. Only add steps to the plan that still NEED to be done. Do not return previously done steps as part of the plan."""
)

replanner = replanner_prompt | ChatOpenAI(model="gpt-4o", temperature=0).with_structured_output(Act)
7、创建执行图
解析来,使用 LangGraph 的 StateGraph 将上面各阶段节点串联为一个有状态工作流程图 ( state machine )。
什么是 StateGraph?
StateGraph 是 LangGraph 中用于定义流程图(state machine)的核心类。它以程序定义的state(状态结构)为基础,在多个执行节点间传递并更新这个状态。可以把它想象成一个装数据的“背包”,每个节点都读取当前状态、做处理,然后返回一个新的状态给下一个节点。
State 具体如何实现?
在 python 中,State 通常定义成一个 TypedDict 或者 Pydantic 的结构,用来存储需要记录的字段,比如用户输入、聊天历史、状态变量等等,每个字段都有其自己的更新方式:
- 覆盖(override):新值替换旧值
- 累加(add):比如聊天记录列表,用
operator.add累加新的消息
如何利用 Nodes 和 Edges 来构成一个流程?
图由节点(Node)和边(Edge)构成,在定义边的时候,节点是有序的对,那么这个图被称为有向图;如果定义边时,节点对仅表示连接,没有指向性,这个图就被称为无向图。
在 StateGraph 中,节点是普通函数或可调用对象,接收当前 state,执行逻辑后返回 要更新的字段和对应新值 的字典。
边则分为:
- 固定边:一个节点执行完成后,直接执行下一个节点
- 条件边:基于状态判断要跳转到哪个节点,支持分支、循环等逻辑
更多的内容可以参考 LangGraph 的官方文档以及官方博客
在实现时,首先 **定义节点(Nodes)**,在这个示例中,节点全是普通函数:
from typing import Literal
from langgraph.graph import END
# 执行节点
async def execute_step(state: PlanExecute):
    plan = state["plan"]
    plan_str = "\n".join(f"{i + 1}. {step}" for i, step in enumerate(plan))
    task = plan[0]
    task_formatted = f"""For the following plan:
{plan_str}\n\nYou are tasked with executing step {1}, {task}."""
    agent_response = await agent_executor.ainvoke(
        {"messages": [("user", task_formatted)]}
    )
    return {
        "past_steps": [(task, agent_response["messages"][-1].content)],
    }
# 规划步骤节点
async def plan_step(state: PlanExecute):
    plan = await planner.ainvoke({"messages": [("user", state["input"])]})
    return {"plan": plan.steps}
# 重新规划节点
async def replan_step(state: PlanExecute):
    output = await replanner.ainvoke(state)
    if isinstance(output.action, Response):
        return {"response": output.action.response}
    else:
        return {"plan": output.action.steps}
# 判断是否结束
def should_end(state: PlanExecute):
    if "response" in state and state["response"]:
        return END
    else:
        return "agent"
节点定义好以后,再继续 **定义边(Edges)**:
from langgraph.graph import StateGraph, START

workflow = StateGraph(PlanExecute)
# 添加计划节点
workflow.add_node("planner", plan_step)
# 添加执行步骤
workflow.add_node("agent", execute_step)
# 添加一个replan节点
workflow.add_node("replan", replan_step)

# planner作为流程图的起点
workflow.add_edge(START, "planner")
# 起始节点到执行节点
workflow.add_edge("planner", "agent")
# 执行节点到重新规划节点
workflow.add_edge("agent", "replan")
# 重新规划节点根据 should_end 函数的结果来确定是到结束节点,还是执行节点
workflow.add_conditional_edges(
    "replan",
    # 传递一个函数,该函数将确定下一个调用哪个节点
    should_end,
    ["agent", END],
)

# 最后将 StateGraph 编译成 LangChain Runnable
app = workflow.compile()
Runnable 是 LangChain 中的一个标准接口,用于定义可执行的任务模块和组件,它可以表示大语言模型调用、数据处理、工具调用和各种自定义逻辑。在 LangGraph 中,StateGraph 在 调用 compile() 后,得到的是一个可执行的图结构——即 CompiledStateGraph,它本身实现了 Runnable 接口,可以调用:
- 单个输入执行:使用
.invoke(input, config)触发。 - 批量并发运行:使用
.batch([...])或.astream(...)。 - 支持中断点调试、变量绑定、checkpoint 恢复(checkpoint 可记录状态版本)。
- 可生成并行或串行节点执行(图模型底层支持 Pregel 超步并行机制)
8、执行流程
StateGraph 编译得到 CompiledStateGraph 后,可以像下面这样执行:
config = {"recursion_limit": 50}
inputs = {"input": "what is the hometown of the mens 2024 Australia open winner?"}
async for event in app.astream(inputs, config=config):
    for k, v in event.items():
        if k != "__end__":
            print(v)
执行代码将输出:
{'plan': ["Identify the winner of the men's 2024 Australian Open.", 'Research the hometown of the identified winner.']}
{'past_steps': [("Identify the winner of the men's 2024 Australian Open.", "The winner of the men's singles tennis title at the 2024 Australian Open was Jannik Sinner. He defeated Daniil Medvedev in the final with scores of 3-6, 3-6, 6-4, 6-4, 6-3 to win his first major singles title.")]}
{'plan': ['Research the hometown of Jannik Sinner.']}
{'past_steps': [('Research the hometown of Jannik Sinner.', "Jannik Sinner's hometown is Sexten, which is located in northern Italy.")]}
{'response': "The hometown of the men's 2024 Australian Open winner, Jannik Sinner, is Sexten, located in northern Italy."}
总结
Agent 的核心价值在于:赋予大模型感知与行动能力,让它能自动与外部世界互动,完成复杂任务。在这里,我们深入探讨了 Agent 的概念及其运作机制,并详细讲解了 Agent 中两种最常用的设计模式:
- ReAct 模式适合实时决策、逐步探索的任务
- Plan and Execute 模式适合结构明确、可规划的任务
我们还分别写了两个小的示例,通过这两个示例,我们可以看出,构建 Agent 并不神秘,更没有我们想象的那么复杂。你只需一个大模型、一组工具、以及一段 orchestrator 代码,就可以构建出一个强大的智能体。更何况,这其中的很多脏活累活,已经被像 LangChain 这样的框架帮我们干了,我们唯一要做的就是发挥想象。
附录:ReAct 模式系统提示词模板示例
你需要解决一个问题。为此,你需要将问题分解为多个步骤。对于每个步骤,首先使用 <thought> 思考要做什么,然后使用可用工具之一决定一个 <action>。接着,你将根据你的行动从环境/工具中收到一个 <observation>。持续这个思考和行动的过程,直到你有足够的信息来提供 <final_answer>。

所有步骤请严格使用以下 XML 标签格式输出:
- <question> 用户问题
- <thought> 思考
- <action> 采取的工具操作
- <observation> 工具或环境返回的结果
- <final_answer> 最终答案

⸻

例子 1:

<question>埃菲尔铁塔有多高?</question>
<thought>我需要找到埃菲尔铁塔的高度。可以使用搜索工具。</thought>
<action>get_height("埃菲尔铁塔")</action>
<observation>埃菲尔铁塔的高度约为330米(包含天线)。</observation>
<thought>搜索结果显示了高度。我已经得到答案了。</thought>
<final_answer>埃菲尔铁塔的高度约为330米。</final_answer>

⸻

例子 2:

<question>帮我找一个简单的番茄炒蛋食谱,并看看家里的冰箱里有没有西红柿。</question>
<thought>这个任务分两步。第一步,找到番茄炒蛋的食谱。第二步,检查冰箱里是否有西红柿。我先用 find_recipe 工具找食谱。</thought>
<action>find_recipe(dish="番茄炒蛋")</action>
<observation>简单的番茄炒蛋食谱:将2个鸡蛋打散,2个番茄切块。热油,先炒鸡蛋,盛出。再热油,炒番茄至软烂,加入鸡蛋,放盐调味即可。</observation>
<thought>好的,我已经有食谱了。食谱需要西红柿。现在我需要用 check_fridge 工具看看冰箱里有没有西红柿。</thought>
<action>check_fridge(item="西红柿")</action>
<observation>冰箱检查结果:有3个西红柿。</observation>
<thought>我找到了食谱,并且确认了冰箱里有西红柿。可以回答问题了。</thought>
<final_answer>简单的番茄炒蛋食谱是:鸡蛋打散,番茄切块。先炒鸡蛋,再炒番茄,混合后加盐调味。冰箱里有3个西红柿。</final_answer>

⸻

请严格遵守:
- 你每次回答都必须包括两个标签,第一个是 <thought>,第二个是 <action> 或 <final_answer>
- 输出 <action> 后立即停止生成,等待真实的 <observation>,擅自生成 <observation> 将导致错误
- 如果 <action> 中的某个工具参数有多行的话,请使用 \n 来表示,如:<action>write_to_file("/tmp/test.txt", "a\nb\nc")</action>
- 工具参数中的文件路径请使用绝对路径,不要只给出一个文件名。比如要写 write_to_file("/tmp/test.txt", "内容"),而不是 write_to_file("test.txt", "内容")

⸻

本次任务可用工具:
${tool_list}

⸻

环境信息:

操作系统:${operating_system}
当前目录下文件列表:${file_list}